IntroductionWelcome to SplashNotes for iPhone, an easy to use, versatile outliner for Mac, Windows, iPhone and Palm OS. SplashNotes can help you create plans, organize thoughts, make task lists, write speeches, and lots more. SplashNotes is also a great tool for communicating your projects and plans to your colleagues. This manual will teach you the basics of how to get started using SplashNotes. SplashNotes is an organizational tool that is only limited by your own creativity. While reading through the manual, think of all the areas of your life where SplashNotes could benefit you and help you get organized. If you are new to outlining, be sure to read the section titled "What is Outlining?" to get the most out of the concepts that inspired SplashNotes. FeaturesOrganizational Features
Easy to Use
What is Outlining?Outlining is a multi-step process that helps you take raw ideas, organize them, and turn them into a final product. The steps of outlining are: BrainstormingBrainstorming is the process of capturing your ideas about a subject, the raw material for your project. Brainstorming can be done individually, but is even more powerful when done in a group. Members of the group say out loud their ideas about something, and one person attempts to write them all down. While brainstorming, no ideas should be ruled out. Anything goes. Brainstorming at its best is quite fun. Often times it can even be hilarious, with people shouting out the most ridiculous things. All ideas should be written down no matter how far out. If you are brainstorming on your own, try to stretch your mind to look for all angles to a problem or subject. By keeping all ideas open during the brainstorming phase, without judging them. Participants will feel more free to include them. Also, ideas that may eventually be ruled out might trigger other ideas that might be the best ones. By ruling out the ridiculous too early, you may never get to the good ideas that follow them. SplashNotes can help you capture ideas during the brainstorming phase. Simply enter one thought per line. Enter a return when starting a new thought, and a new item will be created. You can quickly create a very large list of ideas. OrganizingDuring the Organizing phase, you attempt to group the ideas together under logical headings. These groupings can then be further broken down into sub-groups. This process will help you break a large project down into smaller projects, and those into smaller still. Your goal here is break the project down into small enough groups that they are understandable and manageable. One problem with brainstorming on paper is that when you get to the organizing phase, you must rewrite all the ideas into some structure. Some people advocate writing all the ideas onto paper and cutting them up so they can be easily rearranged. However, if you want to contrast different arrangements at this phase, you must make multiple copies. It can be a nightmare. SplashNotes's drag and drop editing makes this stage of outlining quite easy. To reorganize ideas, simply drag them and drop them where you want. You can group ideas together by indenting them under larger concepts. If you want to contrast different ways of organizing an outlining, you can save an outline as a template and create as many copies as you need. AnalyzingDuring the analyzing phase, you narrow the focus of your project to manageable goals, and you delete any ideas that you wrote down, but that you have decided not to use in this project. At this phase, you may discover parts of your outline which are incomplete, which may require you to go back to the Brainstorming and Organizing phases to fill out all areas of your outline. SplashNotes helps you analyze your ideas by allowing you to temporarily hide items that you think you may not need. You can then try out different scenarios of what your final outline will look like, without losing information. Once you have decided on a final list, you can permanently delete all the items that you do not want to include. FinishingOnce you have your outline complete, it is time to finish your project. Depending on what you are working on, this may require different approaches. For example, if you are creating an outline of a report you are writing, you will want to use the outline as a guide to write your report in Word. Or, keeping the outline in SplashNotes may be your finishing step. For example, many teachers use SplashNotes to create curriculum and lesson notes. While teaching a class, they check off items they have completed. They can then always know what progress they have made in a particular course. By saving an outline as a template, a teacher can reuse the course outline the next time the course is taught. Or perhaps your outline represents a project plan. SplashNotes's checklist feature can then be used to check off items in a project as they are completed. SplashNotes on the iPhone/iPod touchOutline List
Outline Info
Outline Editor
Notes and Images
SplashNotes Desktop Application |
 |
Choose Line Numbering from the Format menu if you want SplashNotes to automatically number the lines of the outline. A number of pre-selected numbering schemes are included in the Numbering list, including Legal, Roman, Numeric, Alphabetic, and a mixture. When you select a numbering scheme, a small arrow will appear to the right. Tap that arrow to select the number suffix that will appear after the number. |
Synchronization
Items may be created or edited on the Handheld or Desktop and the changes can be synchronized over your local WiFi network.
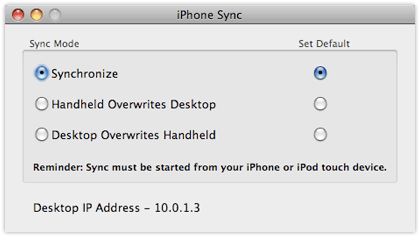
By default information is synchronized in both directions, but you can adjust the settings, in iPhone Sync settings which can be opened from the File menu.
In most cases, you will wish to leave the Default setting (on the right) set to Synchronize. This means that after changing it to Desktop Overwrites Handheld and doing a sync, it will revert back to Synchronize for the next sync so you don't have to go back in and change the setting back manually.

Here are the possible sync settings and the results they will bring about:
- Synchronize -- Changes made on the Handheld or the Desktop will be synchronized. If an outline is edited on both sides between syncs, both versions of the outline will be kept so you can manually compare which one you want to keep. You will find these in the Conflicts folder of the Outline List on the desktop application.
- Desktop overwrites handheld -- All data on the Desktop is copied to the handheld. Any data on the Handheld will be replaced.
- Handheld overwrites Desktop -- All data on the Handheld is copied to the Desktop. Any data on the Desktop will be replaced.
In order to synchronize, you must do the following:
- Select the same network that your computer is on for your handheld to join
- Open the SplashNotes desktop
- Select the correct user from the User menu in the SplashNotes desktop to match the device name
- Adjust the iPhone Sync settings in File > iPhone Sync if you wish
- Start the Sync on the handheld:
 1. Tap Sync on Outline List screen |
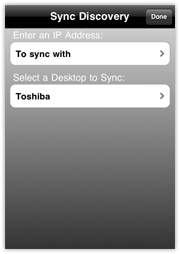
 2. Select your desktop computer |
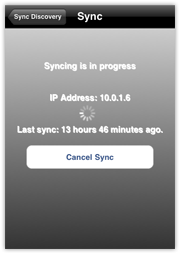
 3. Tap "Start Sync" |
Creating an Ad Hoc Network
If you have trouble connecting your handheld and desktop SplashNotes, or if you want to make your sync connection with the handheld more private, you can set up an Ad hoc network (aka Computer-to-Computer network), and then perform your sync with both devices on that network. Here's how:
Mac OS
- Click the Airport icon in the menu bar, and select Create Network.
- Select options for the network such as name and if you wish to password protect it.
- On the handheld, join the new network from the list in Settings > Wi-Fi.
- Now open SplashNotes on both the handheld and desktop and proceed with the Synchronization.
Windows Vista
- Open Connect to a Network by clicking the Start button , and then clicking Connect to
- Click Set up a connection or network.
- Click Set up an ad hoc (computer-to-computer) network, click Next, and then follow the steps in the wizard.
- On the handheld, join the new network from the list in Settings > Wi-Fi.
- Now open SplashNotes on both the handheld and desktop and proceed with the Synchronization.
This Vista setup information was gathered from this documentation Here you can find information on setting up an Ad hoc Network in Windows XP.
Ideas for What to Do with SplashNotes
Creating Handheld References
If you have an iPhone or iPod touch, get the iPhone version of SplashNotes on the App Store. SplashNotes is ideal for reference information. Because it is hierarchical, you can quickly drill down to the information you need. Examples include: dictionaries, encyclopedias, catalogs, field guides, travel information, parts lists, web site lists, and more. You can even attach images to the items to enhance the effectiveness of the reference.
Brainstorming
A brainstorming session is more helpful when the ideas are then organized,
categorized, and prioritized. To use SplashNotes for this, jot down an
idea for each item, then create categories under which the ideas belong.
For example, for a brainstorm session on marketing strategies, the categories
that would emerge might be: Internet marketing, TV, Mailings, Trade Shows,
Magazines, etc. Underneath each of these would be other sub-categories,
and so on.
Task Lists
Use SplashNotes to create more complicated and hierarchical lists than the simple lists that come with your handheld. For example you may have tasks in different areas of your life: Work (which may have many sub-headings as well), house projects, travel, hobbies, health, food, volunteer work, movies to rent, raising the kids, web sites to remember, etc.
Project Management
Keep track of a project by first listing the major tasks of a project, then adding subordinate tasks to each major task to list the steps required to complete that task. As a task is completed, check it off. When all the subordinate tasks are checked, the parent task is automatically checked.
Assign tasks to individuals by listing their name on the task. You can
then search for which tasks are assigned to that person using the Find
command.
Education
> Assessment
Teachers can easily move around the classroom to assess students while they are learning. For example, you can take a list of educational standards and turn into a checklist. You can create this list for each student and even add special notes to various items. You can also keep track of the mountains of homework data and other information. There are many different ways to create student files and to use rubrics and checklists for individualized and authentic assessments. Many examples of rubrics, checklists, and assessment ideas are included in SplashNotes for Teachers.
> Lesson Plans
Teachers can create lesson plans and use ideas for activities right there on the handheld. You can create your own lesson plan templates (or use the ones provided). Wherever you are (e.g., boring faculty meetings), you can develop lesson plans. You can refer to other resource outlines in SplashNotes for Teachers, such as Lesson Plan Creating, Lesson Plan Template, Before Reading Activities, etc.
> Organizing Tasks & Ideas
Teachers' "To Do" lists are so long and chaotic (& often lost) that things don't get done and you get further stressed by keeping it all in your heads. SplashNotes eases the mental burden by grouping ideas and tasks in logical ways. Examples include lists & priorities, parent contacts, materials & supplies, curriculum and instruction ideas
> Note Taking & Research
Students can take notes and create outlines as they listen learn. They can take notes on research materials or textbooks. They can use the Research Paper Template and other outlines.
Product Testing and QA
SplashNotes is perfect for creating test plans. As you think about the product you are testing, you can continuously add ideas and areas of the product you want to explore. Once all the portions of a product are mapped out, you can save the outline as a template, and then create copies of the outline for each type of test you want to perform (usability, stress, automated testing, functional, unit, etc.). Keep track of which tests you have completed by checking off the tested items.
Medical Care
The multi-level outline format is ideal for the complex data organizing that is involved in many areas of medicine and patient care. Medical professionals can create and share outlines to be used in patient diagnosis, administering medicines, keeping updated on medical practices, etc.


